This post may contain affiliate sales links. Please read my disclosure policy.
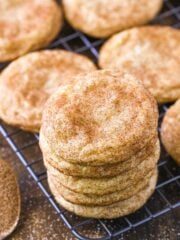
These homemade French Madeleines are light and airy tea cakes dusted with powdered sugar. You can keep them simple for a casual treat or dress them up for the holidays!

A Classic French Madeleines Recipe
These madeleines are sweet, buttery and perfect with a cup of coffee or tea! They’re a tasty cross between cake and a cookie. They aren’t hard to make, but they do require a little bit of attention to detail to get them just right.
For many, the sign of a perfectly baked madeleine is the “belly,” or hump, that they get in the middle when baking. The hump is all about the rise, which should indicate a lighter or fluffier madeleine. With this recipe, your madeleines will rise perfectly every time!
What Are Madeleines?
Are these cake or cookies? They kind of look like cookies, and they’re often referred to that way, but they’re technically little cakes. Unlike many cakes, these don’t begin with the usual process of creaming butter and sugar together. Instead, the base of these little cakes are whipped eggs and sugar.

Recipe Ingredients
My secret ingredient for perfect madeleines is definitely the browned butter. It really intensifies the buttery goodness of the tea cakes and adds amazing flavor. Make sure you don’t leave it out!
- Unsalted Butter
- All-Purpose Flour
- Baking Powder
- Salt
- Eggs: Bring your eggs to room temperature before you begin.
- Sugar
- Vanilla Extract
- Lemon Zest
- Powdered Sugar: The confectioners sugar is an optional topping for your madeleines.

How to Make Madeleines
This recipe is very straightforward, but madeleines do take a little time and care to prepare. They bake up super quickly with crisp edges and light, buttery insides!
- Brown Butter: Melt the butter in a saucepan over medium heat, then reduce heat to low. Continue cooking until you see the browned solids form and sink to the bottom of the pan, about 10 minutes.
- Set Aside: Remove the butter from the heat and pour into a bowl to cool to about room temperature. You don’t want it to get too cool/solid or it’ll be harder to incorporate later.
- Combine Flour, Salt & Baking Powder: In a medium bowl, combine the flour, baking powder and salt. Set aside.
- Beat Eggs: Add the eggs and sugar to a large mixing bowl fitted with the whisk attachment. Beat on medium-high speed until the mixture has thickened and is pale in color, about 7-8 minutes. It should reach the ribbon stage where it drizzles off the whisk in one continuous, smooth stream/ribbon, rather than being clumpy.
- Combine Mixtures: Gently fold in the flour mixture in three parts, taking care not to deflate the eggs.
- Add Browned Butter, Vanilla & Lemon: Fold in the browned butter, vanilla extract and lemon zest.
- Chill Batter: Refrigerate the mixture for at least 4 hours or up to 24 hours. If you’re looking for that nice rise in the center, I found that the rise was best after at least 6 hours of chill time.
- Prepare for Baking: Preheat the oven to 375 degrees and grease your madeleine pan with non-stick baking spray or brush the molds with melted butter.
- Fill Molds: Spoon roughly a tablespoon of batter into the center of each mold. No need to spread it out, it will spread as it bakes.
- Bake: Bake for 10-12 minutes or until the edges are lightly browned and the centers have risen.
- Let Cool Briefly & Serve: Allow to cool in the pan for 1-2 minutes, then remove to a cooling rack. Dust with powdered sugar and serve warm.

Tips for the Best Madeleines
- Don’t Deflate the Eggs: If you’ve ever worked with whipped eggs or egg whites, then you know it’s imperative to not deflate the eggs after whipping them when you add the rest of the ingredients. You also want to be sure that the eggs are at room temperature.
- Don’t Skip Chill Time: I tested these with and without refrigerating the batter, and you definitely get a better rise and texture if you refrigerate it. You can bake them after about 4 hours with great results, but I found they were best after about 6 hours. You can refrigerate the batter for up to 24 hours, but it starts to not rise as well after that.
- Serve Warm: These little cakes are 100% best when served warm, a few minutes after baking them. Because of that, it’s nice to make the batter in advance and then bake them as needed. Fortunately, they spoon into the pan easily and bake quickly. After baking, just dust them with some powdered sugar and serve!
- Get Creative: Feel free to have fun with these and experiment with different ways to serve them. They taste amazing dipped in chocolate and covered with sprinkles or crushed nuts!

How to Store Homemade Madeleines
Madeleines are best if eaten within the first few hours after they’re made, but you can definitely store leftovers for a day or two. Just keep them in an airtight container in the fridge and wait to top them with powdered sugar. The texture won’t be the same after you refrigerate them, so I recommend reserving some of the batter if you want to save some madeleines for the next day.
Can You Freeze Madeleines?
I would avoid freezing your madeleines. They simply won’t be the same afterward. If 32 is going to be too many for you, you can simply reduce each of your ingredients by half and make 16 instead.
Print
Classic Madeleines Recipe
- Prep Time: 45 minutes
- Cook Time: 10 minutes
- Total Time: 4 hours 55 minutes
- Yield: 32
- Category: Dessert
- Method: Oven
- Cuisine: French
Description
These buttery homemade French Madeleines are light and airy tea cakes dusted with powdered sugar. You can keep them simple for a casual treat or dress them up for the holidays!
Ingredients
- 10 tbsp (140g) unsalted butter
- 1 cup (130g) all purpose flour
- 1 tsp baking powder
- 1/4 tsp salt
- 3 large eggs, room temperature
- 3/4 cup (155g) sugar
- 2 tsp vanilla extract
- 1 1/2 tsp lemon zest
- 1/2 cup (58g) powdered sugar, optional
Instructions
- Melt the butter in a saucepan over medium heat, then reduce heat to low. Continue cooking until you see the browned solids form and sink to the bottom of the pan, about 10 minutes.
- Remove the butter from the heat and pour into a bowl to cool to about room temperature. You don’t want it to get too cool/solid or it’ll be harder to incorporate later.
- In a medium bowl, combine the flour, baking powder and salt. Set aside.
- Add the eggs and sugar to a large mixing bowl fitted with the whisk attachment. Beat on medium-high speed until the mixture has thickened and is pale in color, about 7-8 minutes. It should reach the ribbon stage where it drizzles off the whisk in one continuous, smooth stream/ribbon, rather than being clumpy.
- Gently fold in the flour mixture in three parts, taking care not to deflate the eggs.
- Fold in the browned butter, vanilla extract and lemon zest.
- Refrigerate the mixture for at least 4 hours or up to 24 hours. If you’re looking for that nice rise in the center, I found that the rise was best starting after about 6 hours.
- Preheat oven to 375 degrees and grease your madeleine pan with non-stick baking spray or brush the molds with melted butter.
- Spoon roughly a tablespoon of batter into the center of each mold. No need to spread it out, it will spread as it bakes.
- Bake for 10-12 minutes or until the edges are lightly browned and the centers have risen.
- Allow to cool in the pan for 1-2 minutes, then remove to a cooling rack. Dust with powdered sugar and serve warm.
Notes
You do need a specific pan – I used this one.
After testing these many different ways, the best flavor by far comes not only from a little bit of lemon zest and vanilla extract, but also from the browned butter. I wouldn’t tell you to add that step if it didn’t truly make a difference in flavor. Definitely don’t skip it.
Nutrition
- Serving Size:
- Calories: 79
- Sugar: 6.6 g
- Sodium: 25.8 mg
- Fat: 4.1 g
- Carbohydrates: 9.8 g
- Protein: 1 g
- Cholesterol: 27 mg
Keywords: madeleine cookies, tea cake, mini cakes, best christmas cookies, french dessert, tea cookies, brown butter cookies, butter cookies
- These easy Russian Tea Cakes are another stellar snack to pair with coffee or tea. Famous for looking like snowballs, they’re perfect for the holiday season!
- What could be better than soft and chewy gingerbread cookies? Soft and chewy Gingerbread Cookies with Eggnog Icing, of course!
- These Peppermint Chocolate Thumbprint Cookies are a fun, minty twist on your classic Peanut Butter Blossoms.


Hi Lindsay, I messed this one up. While baking, oh my, they spread out of the molds & didn’t form. It was as if I didn’t put flour in the batter (I did). I knew I was going to have an issue be the batter didn’t rise overnight & some butter settle to the bottom. I did mix it before I spoon it into the molds…that was probably my third mistake.
I think my first mistake was while browning the butter. I was so afraid I was going to burn it, I stirred and I don’t think I let
It brown enough. I did have it on low for 10 minutes. How brown should it be & is stirring bad?
Second mistake is…I was too tired to pull out the kitchen aid (I already made a cheesecake lol) so I used an emersion blender with a whisk to do beat the eggs. I made it 7 minutes holding that thing – it got hot. I don’t think my eggs were ribbon-y enough.
Any help you can provide is appreciated.
Thanks!
Did you try baking another batch with less batter in the molds? It sounds like they may have just been over filled. It may seem like they didn’t rise, but often when things overflow, they just spread out instead of up.
As for your concerns, the batter doesn’t really rise, so that should be fine. For the butter, you’ll see browned bits at the bottom of the pan. The rest of the butter will still look like melted butter. I hope that helps!
Thanks! I’ll try again this weekend. BTW my monster cookie cheesecake minus the peanut butter turned out great!