This post may contain affiliate sales links. Please read my disclosure policy.
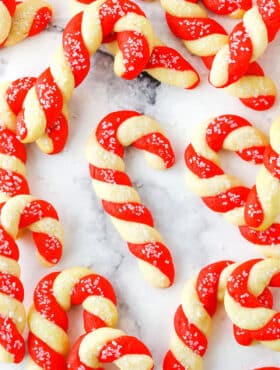
This Candy Cane Cookies recipe is a classic Christmas treat! It’s made with a simple cookie dough that’s flavored with peppermint, colored red and white, and twisted into a candy cane shape!
Looking for more Christmas cookie recipes? Try these soft & chewy Gingerbread cookies, or these easy sugar cookies!

The Story of the Candy Cane
So nobody really knows the exact origin of the candy cane but they actually started out as straight sticks and were completely white. They were also just sugar flavored – not peppermint. Good news for those who want to keep their candy cane cookies extra simple! LOL!
Over time, they became associated with Christmas and a holiday tradition and in the 1900s they became more and more popular. They now have some Christian meanings associated with them, but that isn’t part of their origin.
Thanks to traditions that began a long time ago, we have these super fun cookies for Christmas! While this isn’t a cookie I grew up making at Christmas time, it’s definitely a new favorite! I love the lovely light peppermint flavor they have and they are ridiculously easy to eat. Don’t leave me alone with a plate of them! I’m a little addicted and they’ll be gone in a hot second!
Another thing I love is how simple they are to make. Not complicated at all, but do keep in mind that they are fairly time consuming. All that rolling and twisting takes some time, but hopefully you have some cute little kitchen helpers to speed things up a bit.
And this Candy Cane Cookie recipe is the best! I made these to ensure that they aren’t too dry or firm and stay nice for longer. The main thing I worked on was the flour and cornstarch. While you could leave out the cornstarch and use all flour, adding in the cornstarch allows you to reduce the amount of overall dry ingredients. You replace a fourth cup of flour with two tablespoons of cornstarch and end up with a cookie that’s less firm or dry, but still doesn’t spread too much. It also helps make the cookie dough easier to work with. Yay!

- Combine dry ingredients in a medium sized bowl and set them aside.
- Make the rest of the cookie dough. Start by creaming the butter and sugar together, then add the egg, vanilla extract and peppermint extract. Add the dry ingredients and your dough is ready!
- Color the cookie dough. Divide the dough in half and color one half with red gel icing color until it’s the shade of red you’d like.
- Chill the cookie dough. You’ll want to chill the dough to make it easier to work with. Rather than chill the dough and then have to break apart cold dough to make balls with, I like to make the balls of cookie dough first and then refrigerate them. Then I can just take out one at a time to use as I make the candy candy canes.
- Make the candy canes. Roll one ball of each color of cookie dough into a rope that is 5 inches long. I used a ruler to be sure they were the right size. Place the ropes side by side and gently twist them together. I found it helpful to twist one half first and then the other half, rather than twisting all from the same end.
- Bake them! Move the twisted cookie to the cookie sheet and shape into a “hook”. Press some sprinkles or peppermint crunch onto the fronts of the cookies, then bake ’em! Let them cool and you’re ready to eat some cookies!


- Measure your flour accurately, which is always best with a food scale. I can’t say this enough – a small amount of flour (more or less) can have a big affect on how your cookies bake. If you don’t want dry cookies from adding too much flour, or cookies that spread when they shouldn’t, use a food scale.
- Don’t let the balls of cookie dough sit out for too long before rolling out. The dough is easier to work with when chilled and it’s dries out if it warms up too much and makes it harder to shape the candy canes without cracking.
- Make one full cookie at a time, then make another. This just works better for the workability of the cookie dough.
- Allow the cookies to cool for about 10 minutes before moving them off of the cookie sheet, so they don’t break.
More Christmas Cookies Recipes:
Chocolate Peppermint Thumbprint Cookies
Best Gingerbread Cookies (Soft and Chewy Cutouts)
Best Cutout Sugar Cookies for Decorating
Classic Chewy Snickerdoodles
Classic Spritz Cookies
Easy Sugar Cookie Recipe
Reindeer Cookie Balls
Christmas Tree Chocolate Chip Cookie Cake
Best Southern Pecan Pralines Recipe
Gingerbread Cookies with Eggnog Icing
Gingerbread Cheesecake Cookie Cups
Italian Ricotta Cookies
- Prep Time: 3 hours
- Cook Time: 40 minutes
- Total Time: 3 hours 40 minutes
- Yield: About 60 cookies
- Category: Dessert
- Method: Oven
- Cuisine: American
Description
This Candy Cane Cookies recipe is a classic Christmas treat! It’s made with a simple cookie dough that’s flavored with peppermint, colored red and white, and twisted into a candy cane shape!
Ingredients
- 2 3/4 cups (358g) all-purpose flour
- 2 tbsp cornstarch
- 1 tsp baking soda
- 1/2 tsp baking powder
- 1/2 tsp salt
- 1 cup (224g) unsalted butter, room temperature
- 1 cup (207g) granulated sugar
- 1 egg
- 1 tsp vanilla extract
- 1 tsp peppermint extract
- Red gel icing color
- Sprinkles or peppermint crunch, optional
Instructions
1. Combine flour, cornstarch, baking soda, baking powder and salt in a medium sized bowl and set aside.
2. Cream the butter and sugar together in a large mixer bowl on medium speed until light in color and fluffy. You should be able to see the change in color happen and know it’s ready.
3. Add the egg and vanilla and peppermint extract mix until well combined.
4. Add the dry ingredients and mix just until the dough is well combined. Do not over mix.
5. Divide the cookie dough in half and color one half with some red gel icing color.
6. Refrigerate the cookie dough for 2-3 hours so that it’s easier to work with. I recommend going ahead and making your balls of cookie dough (1 teaspoon in size) while it’s soft, then you can just pull a ball out of the fridge at a time when you’re ready to make your cookies.
7. When you’re ready to make your cookies, preheat oven to 350°F (180°C). Line baking sheets with parchment paper or silicone baking mats. Set aside.
8. Make balls of cookie dough 1 teaspoon in size (if you haven’t done it already) and roll out into a 5 inch long rope. I used a ruler to make sure they were all the right size. Place a white rope and a red rope next to each other and very gently twist together. I found it helpful to twist one half first and then the other half, rather than twisting all from the same end.
9. Place the cookie onto the lined baking sheet and curve part of the twisted cookie over to create the candy cane “hook”.
10. Press some sprinkles or peppermint crunch onto the fronts of the cookies, then bake for 5-7 minutes.
11. Allow cookies to cool for about 10 minutes before transferring to a wire rack to cool completely. You want to be sure they don’t break when you move them.
12. Store cookies in an airtight container. Cookies are best for 4-5 days, but could be frozen for about a month.
Notes
If you don’t have cornstarch on hand, you can replace it with an additional 1/4 cup of flour, but I totally recommend the cornstarch. It makes the cookie dough more workable and keeps the cookies softer – and they stay softer for longer.
Nutrition
- Serving Size: 1 cookie
- Calories: 63
- Sugar: 3.4 g
- Sodium: 42.2 mg
- Fat: 3.2 g
- Carbohydrates: 8 g
- Protein: 0.7 g
- Cholesterol: 11.2 mg
Keywords: candy cane cookies, christmas cookies, easy christmas cookies recipe, best christmas cookies


This recipe was great! Easy to make and tasted subtly peppermint and delicious!
★★★★★
So glad you enjoyed them!
I’m so bummed. I worked so hard on these and when I baked them they spread and did not hold their shape at all! Any tips on why this happened and how can I avoid it? They are still yummy and Christmas looking but way too much work to not come out right. Please help!
They are certainly a lot of work. I’m sorry they didn’t turn out like you expected. The cookie dough spreading or not spreading it truly a balance of the “wet” and dry ingredients. Too much of the dry ingredients and they’d be dry and crumbly. Not enough dry ingredient/too much “wet” ingredients and they spread. As the recipe is written, they shouldn’t spread. But I do use a food scale, which ensures accuracy with the dry ingredients so that they aren’t accidentally over or under measured. My guess is usually that the dry ingredients were off. If not though, then it would be the “wet” ones.
When you say “use a teaspoon of dough”, do you measure the dough into a true teaspoon or a small cookie scoop? Or other?
I used an actual measuring teaspoon.
Will the red actually be red or do you have to mix it with another colour, like you do for buttercream?
I’ve never done that for buttercream. I just use red gel icing color.
My Grandma and Great Aunt made these every Christmas because my name is Candy Cain! Their recipe was a little different from your recipe and I personally found their recipe to be hard to work with because it was a little crumbly. I made these with my kids when they were young and I cannot wait to make this recipe. Thanks for doing all the hard work and figuring out how to keep the dough from being dry by adding cornstarch. May you have a blessed Christmas. Also thank you so much for “Scripture I’m Loving”. Thank you for standing strong as a christian. Just beautiful.
Thanks Candy! I hope you enjoy them!
Thanks Lindsay for your detailed instructions and hints for making this cookie. I think every year that I will make them and always change my mind as they just seem so labor intensive. I am handicapped and still not sure I can do this but feel more confident with your tips and photos. Praying you, your husband and two sweet boys have a terrific holiday with your family and friends.
★★★★★
I hope you get a chance to try them! Thanks, Vickie! I hope you have a wonderful holiday as well!
These are so cute, Lindsay! I’ve made a similar cookie before, but also tinted some of them green because I didn’t have enough red food coloring 🙂 I’d love to make these for our connect group tomorrow. I was wondering if it is absolutely necessary to use gel food coloring, or if it’s possible to use liquid food coloring? The gel food coloring at our stores are Wilton brand and are not made in a peanut-free facility, and one of my family members has an anaphylactic peanut allergy so we don’t like to take chances 🙁 Would liquid food coloring make the dough too soft? Or could I add a teaspoon or so of additional flour to make up for the excess liquid?
The green would be fun too!
I would say that it is necessary to use the gel, but you could try adding additional flour and see. It’s just hard to say without trying it what the results will be like.
Haven’t made these yet, but going to make this week, now that Thanksgiving has past. The reason for the 5 stars is that if the recipe is from you it will be good. I’ve learned that from past recipes.
★★★★★
Thanks Charlotte! I hope you enjoy them!